
Revenue and payouts
Revenue and payout settings define how much the advertiser pays you (revenue) and how much you pay your publishers (payout) for each conversion or event. The two values can differ. The spread is your margin.
Before you begin
Section titled “Before you begin”- Create an offer and assign it to an advertiser.
- Decide which model the advertiser uses to pay you. The payout model can differ from the revenue model.
- For post-conversion events, set up conversion tracking so the click-to-conversion path works end to end.
Open the Revenue & Payout tab
Section titled “Open the Revenue & Payout tab”- Go to Offers > Offers Management and open the offer.
- Select the Revenue & Payout tab.
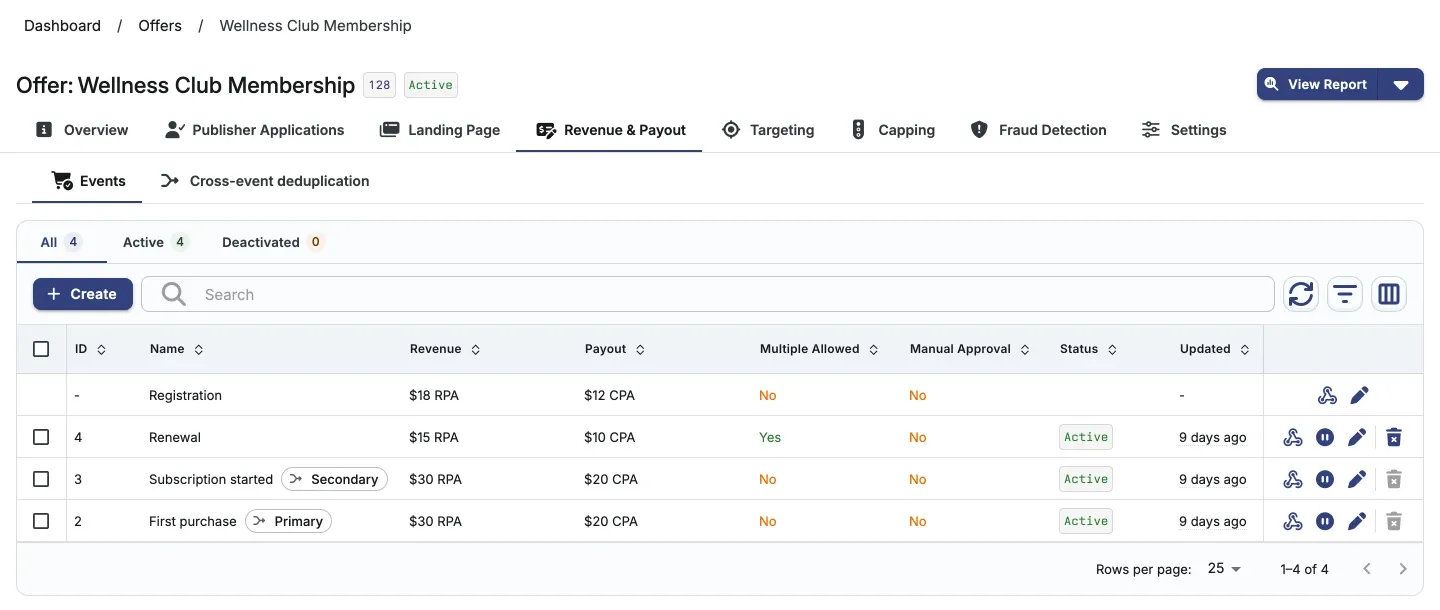
- The default Conversion row, labeled with your Initial Conversion Name, shows the offer-level payout. Click its edit (pen) icon to open the Conversion settings page.
- Click Create to open the custom Event creation page. Editing a custom event opens its Event settings page instead.
The tab has two views: Events (the list above) and Cross-event deduplication, where you pair two events sent for one sale.
Configure the default conversion
Section titled “Configure the default conversion”The Conversion page has three tabs:
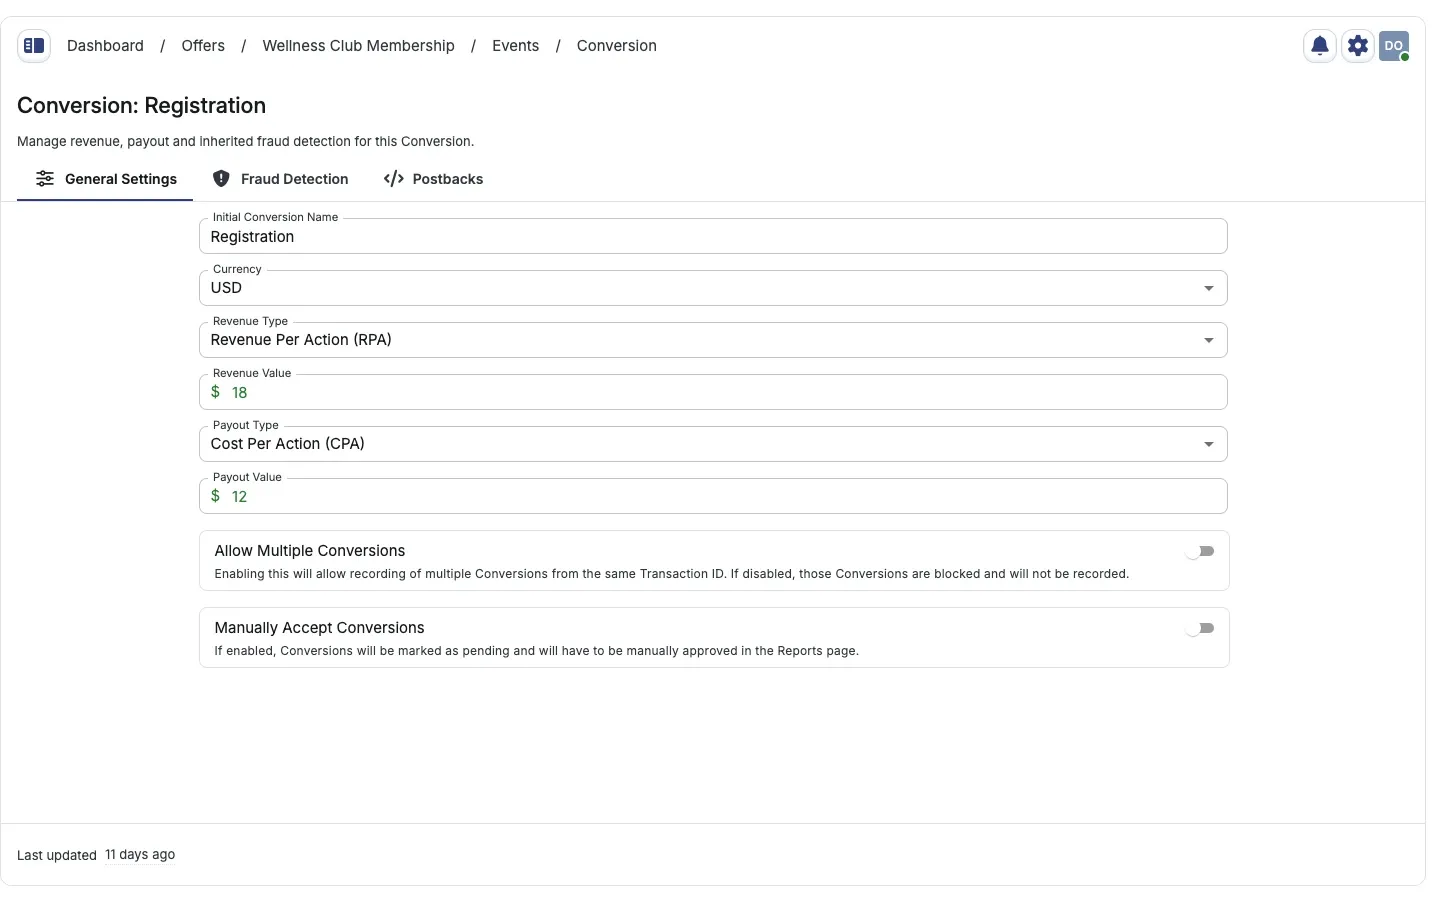
- General Settings: edit the conversion name, currency, revenue, payout, and acceptance options below. Click Save changes to update the offer-backed conversion settings, or Discard to restore them.
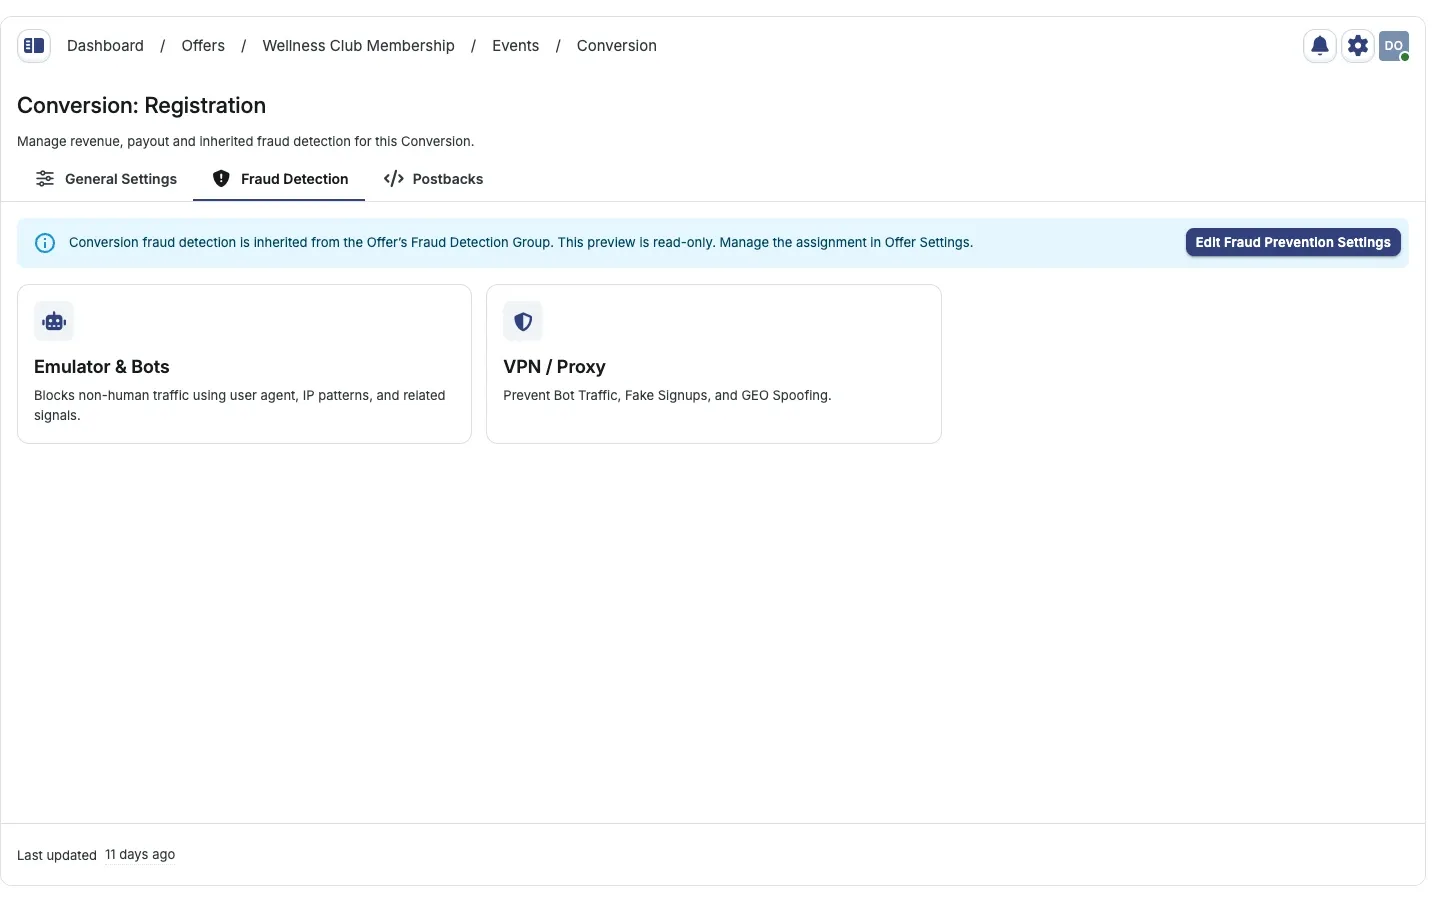
- Fraud Detection: inspect enabled conversion filters inherited from the offer’s assigned Fraud Detection Group. These settings are read-only here. Edit Fraud Prevention Settings opens the offer’s assignment settings.
- Postbacks: build Attribution, Clickless, Image Pixel, or Reject Conversion output. Generating a URL does not send a postback.
| Field | Required | Description |
|---|---|---|
| Revenue Type | Yes | How the advertiser pays you |
| Revenue Value | Depends on type | Fixed amount or percent |
| Payout Type | Yes | How you pay the publisher |
| Payout Value | Depends on type | Fixed amount or percent |
| Currency | Yes | Offer-level currency |
| Allow Multiple Conversions | No | More than one conversion per transaction_id |
| Manually Accept Conversions | No | Conversions stay pending until approved in Reports |
Revenue types
Section titled “Revenue types”How the advertiser pays you:
| Type | Label | Value field |
|---|---|---|
| RPA | Revenue Per Action | Fixed amount |
| RPS | Revenue Per Sale | Percent of sale |
| RPC | Revenue Per Click | Fixed amount |
| RPM | Revenue Per Impression | Fixed amount |
| RPAxRPS | Revenue Per Action and Sale | Fixed amount and percent |
Payout types
Section titled “Payout types”How you pay publishers:
| Type | Label | Value field |
|---|---|---|
| CPA | Cost Per Action | Fixed amount |
| CPS | Cost Per Sale | Percent of sale |
| CPC | Cost Per Click | Fixed amount |
| CPM | Cost Per Impression | Fixed amount |
| CPAxCPS | Cost Per Action and Sale | Fixed amount and percent |
| PRV | Percentage of Revenue | Percent of revenue |
Currency
Section titled “Currency”Each offer has its own currency. Publisher payouts convert to the publisher’s account currency at the rate configured in your account settings.
Post-conversion events
Section titled “Post-conversion events”Custom events track additional actions, for example a first purchase after a free-trial registration or an in-app purchase after an install. Use Attribution when the advertiser can return the original Integr8 click’s transaction_id. For events without a related click, use the Clickless generator and provide its required attribution data.
How events work
Section titled “How events work”Events use the same postback mechanism as conversions, with two additional parameters:
event_id: the numeric ID of the event in Integr8.event_name: the name of the event as defined in Integr8.
Either parameter alone is sufficient, or you can pass both. The values must match exactly what was defined when the event was created.
Example postback URLs:
https://your.domain.com/?secure=TOKEN&event_id=5&transaction_id=REPLACEhttps://your.domain.com/?secure=TOKEN&event_name=purchase&transaction_id=REPLACECreate an event
Section titled “Create an event”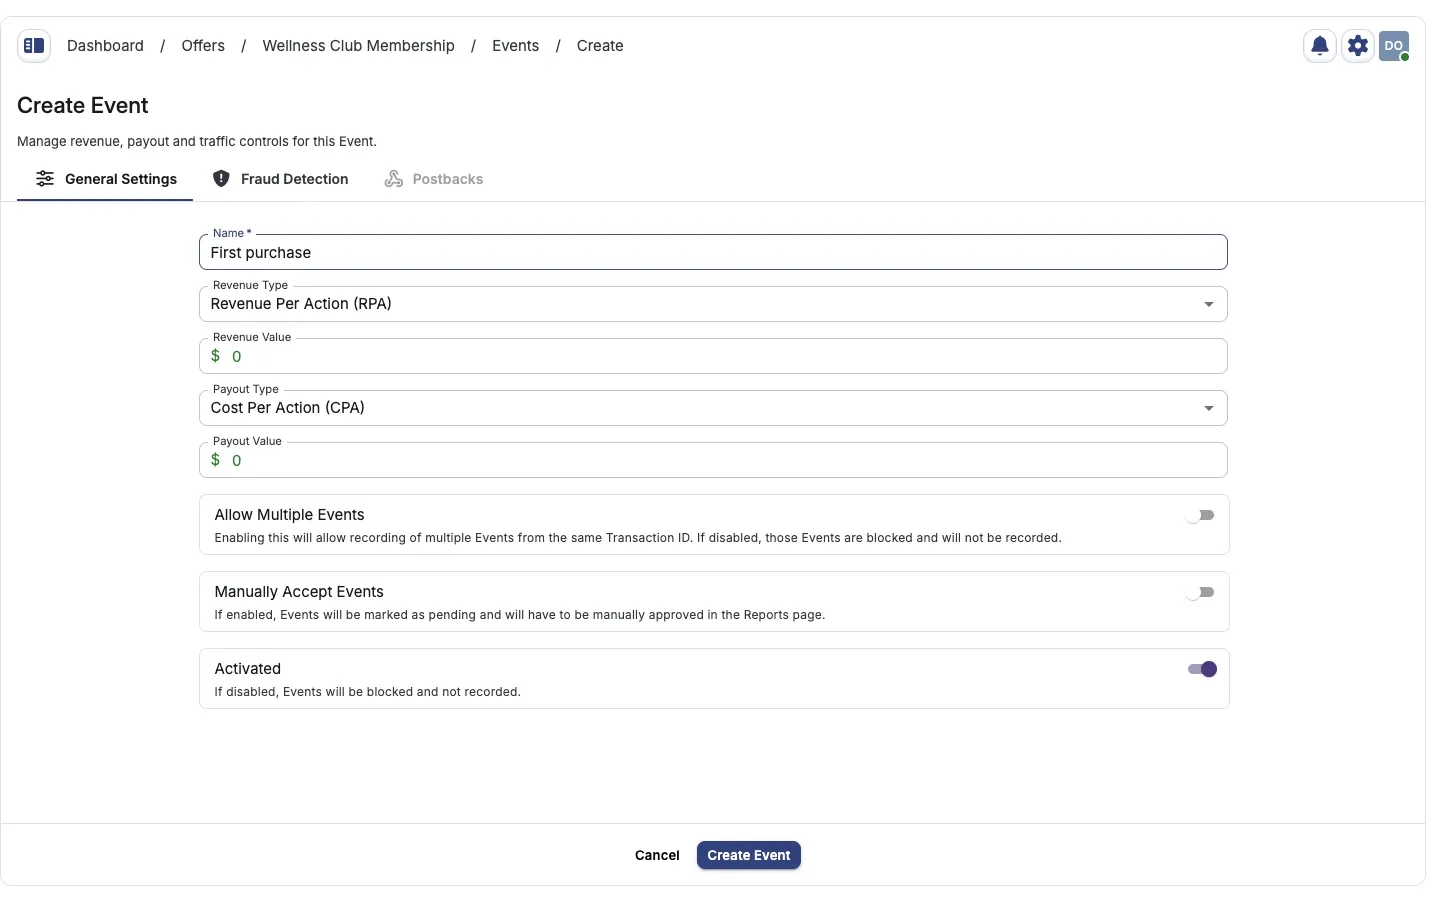
- On the Revenue & Payout tab, click Create.
- On the General Settings tab, set:
- Name: must match the name the advertiser passes in their postback. For AppsFlyer integrations, use the exact event name from the AppsFlyer dashboard.
- Revenue Type and Revenue Value (or Revenue Percent for RPS and RPAxRPS).
- Payout Type and Payout Value (or Payout Percent for CPS, PRV, and CPAxCPS).
- Allow Multiple Events: enable if the same user can trigger this event more than once per click.
- Manually Accept Events: mark events as pending until approved in Reports.
- Activated: disable to block recording for this event.
- Open Fraud Detection to configure the event’s available filters in the catalog. These edits belong to the same event draft.
- Click Create Event. The saved event opens on its standalone settings page.
For an existing event, use Save changes or Discard in the bottom action area. Delete Event is available on General Settings for saved, editable events. Archived offers and users without write access cannot edit these settings.
An event used by a cross-event deduplication rule cannot be deleted or switched to Allow Multiple Events or Manually Accept Events. Change or remove the rule first.
Event field reference
Section titled “Event field reference”| Field | Required | Description |
|---|---|---|
| Name | Yes | Must match the name the advertiser sends in the postback |
| Revenue Type | Yes | RPA, RPS, RPC, RPM, or RPAxRPS |
| Revenue Value / Revenue Percent | Yes | Amount or percent based on revenue type |
| Payout Type | Yes | CPA, CPS, CPC, CPM, CPAxCPS, or PRV |
| Payout Value / Payout Percent | Yes | Amount or percent based on payout type |
| Allow Multiple Events | No | Multiple events per transaction_id |
| Manually Accept Events | No | Events stay pending until approved |
| Activated | No | Disable to stop recording |
Get the event postback URL
Section titled “Get the event postback URL”After creating the event, click the webhook icon on its Revenue & Payout row, or select Postbacks on its settings page. Choose Attribution, Clickless, or Reject Event in the left navigation. The generator keeps the current event selected. Postbacks are unavailable until the event is saved and active.
The default Conversion row’s webhook icon opens the Conversion page’s Postbacks tab, not a dialog.
You can also build a global postback from Offers > Global Tracking > Conversion Global Postback and include the event identifier. See Conversion tracking for parameter and copying guidance.
Next steps
Section titled “Next steps”- View event performance in Reports > Event Report.
- Override payouts per publisher for top performers or test sources.
- Forward events to publishers so they receive the same notification.
- Set offer caps to limit volume and spend.
- Deduplicate two events sent for one sale with a cross-event deduplication rule.