

Alert Manager
Alert Manager watches your click and conversion traffic on a schedule and notifies you when it crosses a threshold you set. Use it to catch a spike in rejected traffic, a drop in conversions, or a sudden surge from one publisher without checking reports by hand.
Each alert checks one condition, for one integration, on a check interval you choose. When the condition is met, the alert fires and Integr8 sends a message to the notification channel attached to it.
When to use Alert Manager
Section titled “When to use Alert Manager”- Getting notified when too many clicks or conversions are rejected for an offer or publisher
- Watching that an offer keeps reaching an expected number of clicks or conversions
- Catching a sharp increase or decrease in click or conversion traffic
- Sending those warnings to the people who act on them, by email or in a Slack channel
Before you begin
Section titled “Before you begin”- You need the admin role in your organization to create, edit, or delete alerts and notification channels. Other users can open Alert Manager and view alerts, but cannot change them.
- Create at least one notification channel. An alert cannot be saved without one.
- For Slack notifications, create a Slack incoming webhook URL first. See https://api.slack.com/messaging/webhooks.
How to access it
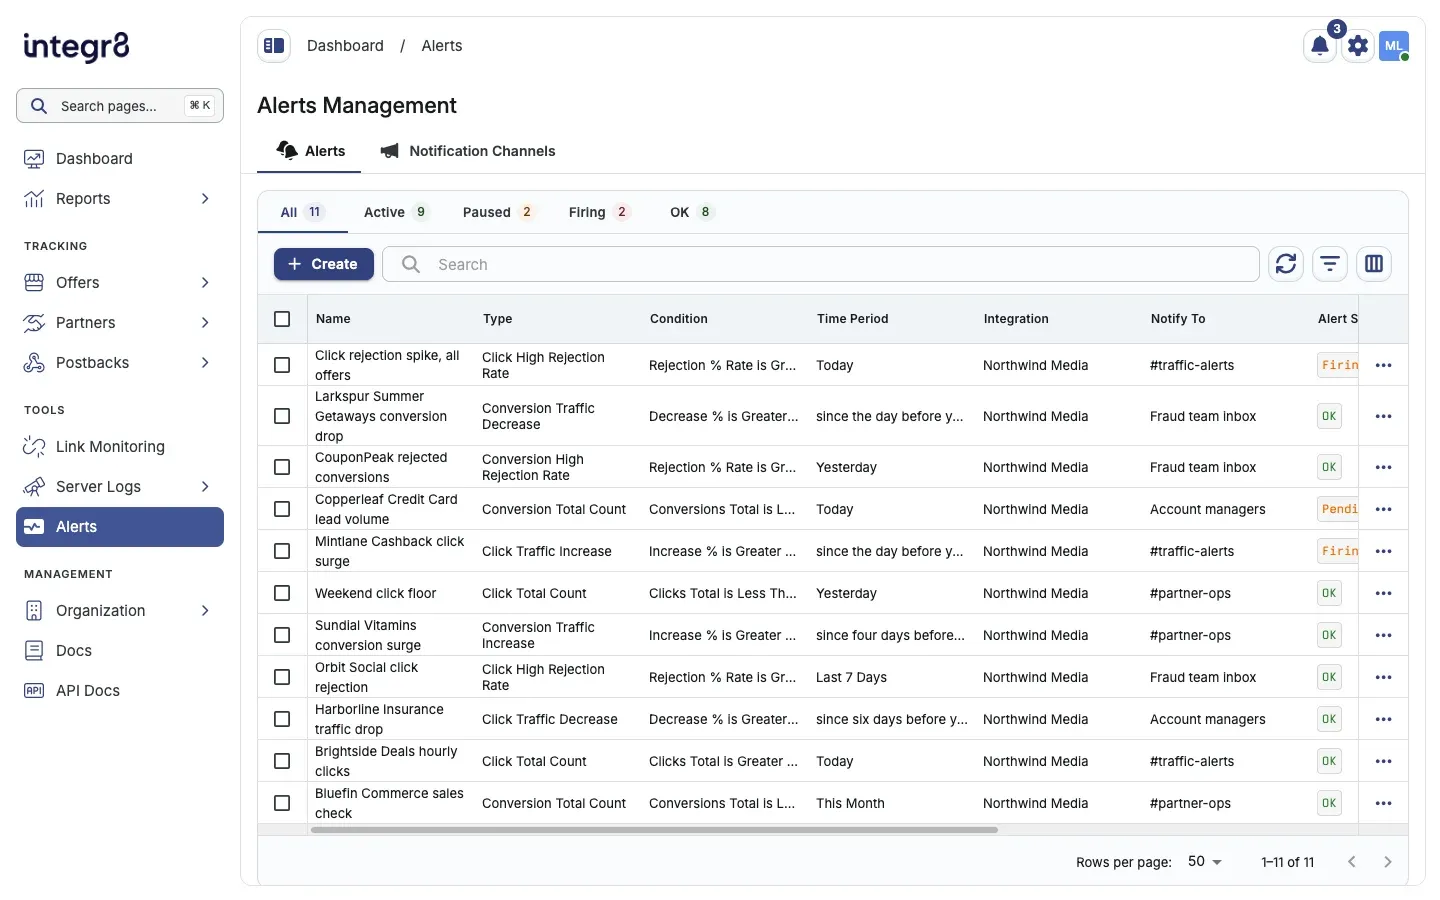
Section titled “How to access it”In the sidebar under TOOLS, open Alerts. The Alerts Management page has two tabs:
- Alerts: every alert in your organization, with its condition and current status
- Notification Channels: the email and Slack destinations your alerts send to
Alert types
Section titled “Alert types”Alerts are grouped into CLICKS and CONVERSIONS. Each group has the same four types:
| Alert type | Fires when |
|---|---|
| High Rejection Rate | The share of rejected clicks or conversions is higher than your threshold for any offer or publisher |
| Total Count | The total number of clicks or conversions is above or below your threshold |
| Traffic Increase | Click or conversion traffic increases by more than your threshold percentage |
| Traffic Decrease | Click or conversion traffic decreases by more than your threshold percentage |
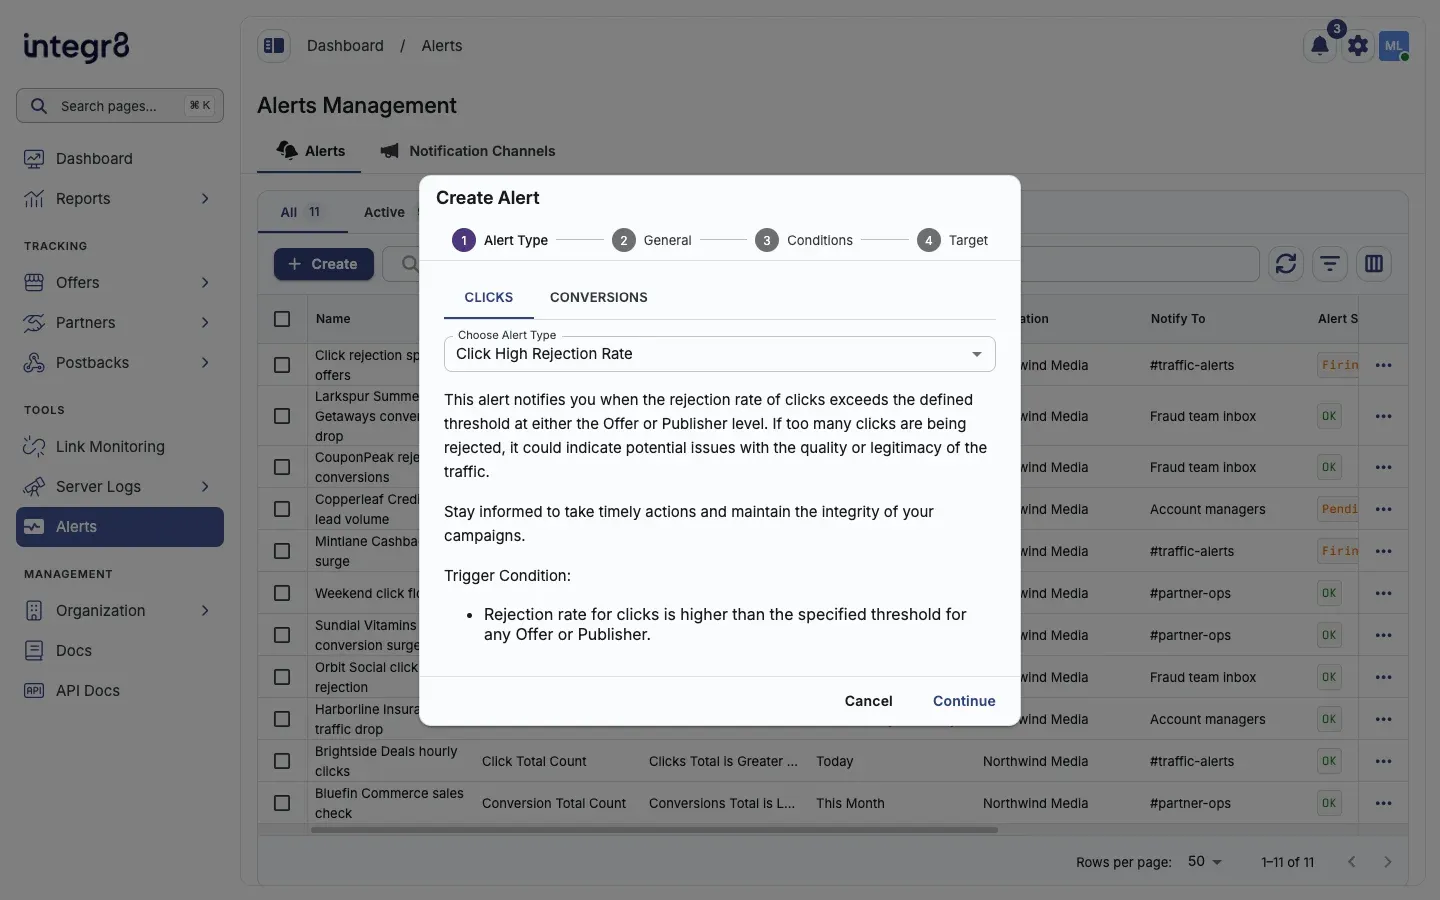
For example, Click High Rejection Rate fires when the rejection rate of clicks for any offer or publisher goes above the percentage you set. A high rejection rate can point to low-quality or fraudulent traffic.
Create a notification channel
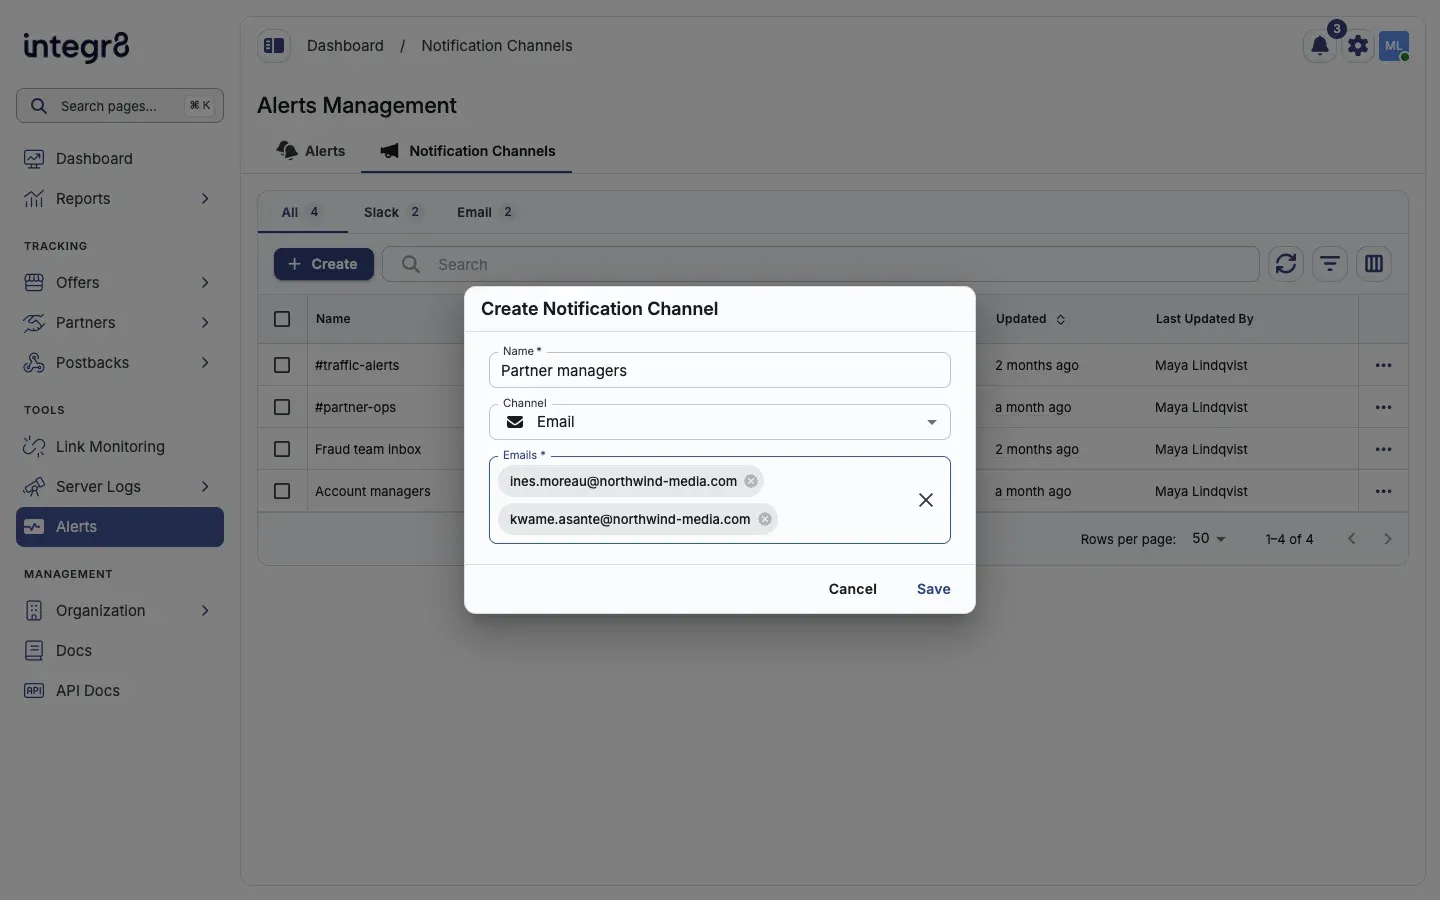
Section titled “Create a notification channel”- Open Alerts under TOOLS, then the Notification Channels tab.
- Click Create.
- Enter a Name. Pick a name your team will recognize when choosing a channel for an alert, such as
#traffic-alertsorFraud team inbox. - Choose the Channel:
- Slack: paste the Slack Webhook URL. It must start with
https://hooks.slack.com/services/. - Email: type an address in Emails and press Enter. Repeat for each recipient.
- Slack: paste the Slack Webhook URL. It must start with
- Click Save.
The Used by alerts column shows how many alerts send to each channel. Click the count to see which alerts they are.
Create an alert
Section titled “Create an alert”Click Create on the Alerts tab. The Create Alert dialog has four steps.
If your organization has no notification channel yet, the dialog asks you to create one first. Click Create Notification Channel to do that without leaving the page.
1. Alert Type
Section titled “1. Alert Type”- Choose CLICKS or CONVERSIONS.
- Pick the alert in Choose Alert Type. The dialog describes what the alert watches and its trigger condition.
- Click Continue.
2. General
Section titled “2. General”- Enter an Alert Name.
- Choose the Notification Channel that should receive this alert.
- Review the three options. All are on by default:
- Skip resolved notifications: no message is sent when the alert returns to normal. Turn it off if you want to know when a problem has cleared.
- Repeat firing notifications: a message is sent on every check while the condition is still met. Turn it off if the alert is too noisy, and you will only be notified again after the alert has recovered and fires again.
- Activated: the alert runs on its schedule. Turn it off to create the alert paused.
- Click Continue.
3. Conditions
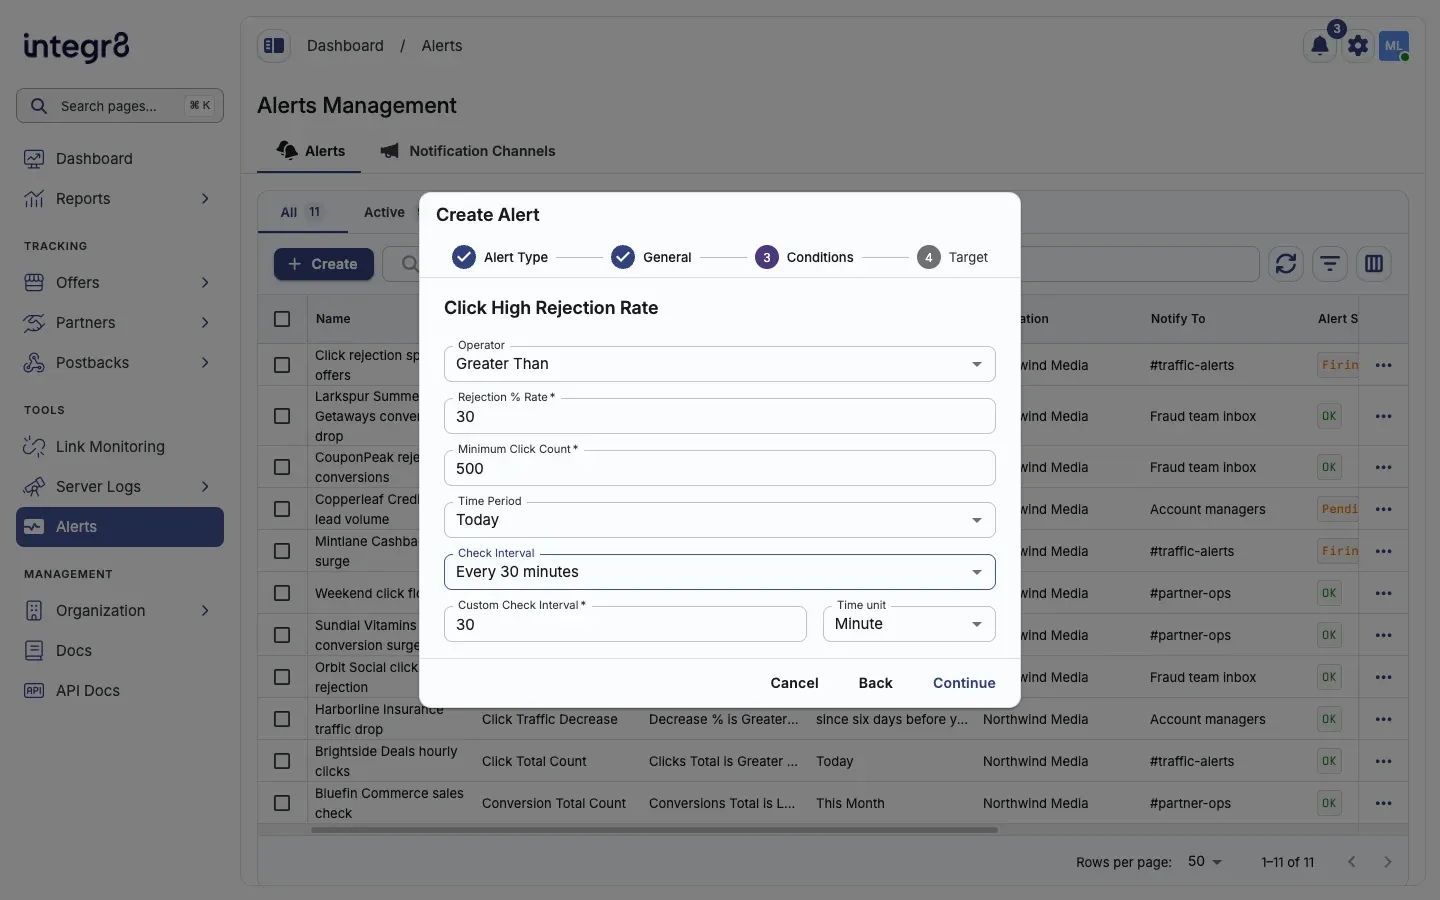
Section titled “3. Conditions”The fields depend on the alert type.
| Alert type | Fields |
|---|---|
| High Rejection Rate | Operator, Rejection % Rate, Minimum Click Count or Minimum Conversion Count, Time Period |
| Total Count | Operator (Greater Than or Less Than), Clicks Total or Conversions Total, Time Period |
| Traffic Increase | Operator, Increase %, Time Period |
| Traffic Decrease | Operator, Decrease %, Time Period |
Thresholds must be greater than 0. Minimum Click Count and Minimum Conversion Count set how much traffic is needed before the rejection rate counts, so a handful of rejected clicks on a quiet offer does not fire the alert.
Time Period sets the window of data each check looks at:
| Alert type | Time Period options |
|---|---|
| High Rejection Rate | Today, Yesterday, Last 7 Days, This Month |
| Total Count | Today, Yesterday, This Month, This Year |
| Traffic Increase and Traffic Decrease | Since the day before yesterday, since four days before yesterday, since six days before yesterday |
Check Interval sets how often the alert runs. Pick a preset, or choose Custom (Configure below) and enter a Custom Check Interval and Time unit. The allowed range depends on the alert type:
| Alert type | Shortest interval | Longest interval |
|---|---|---|
| High Rejection Rate | 5 minutes | 48 hours |
| Total Count | 5 minutes | 168 hours |
| Traffic Increase and Traffic Decrease | 24 hours | 48 hours |
Click Continue when the conditions are set.
4. Target
Section titled “4. Target”- Choose the Integration the alert watches.
- Optional: under Offer Filters, add the offers to evaluate. Leave it empty to evaluate All Offers.
- Optional: under Publisher Filters, add the publishers to evaluate. Leave it empty to evaluate All Publishers.
- Click Save.
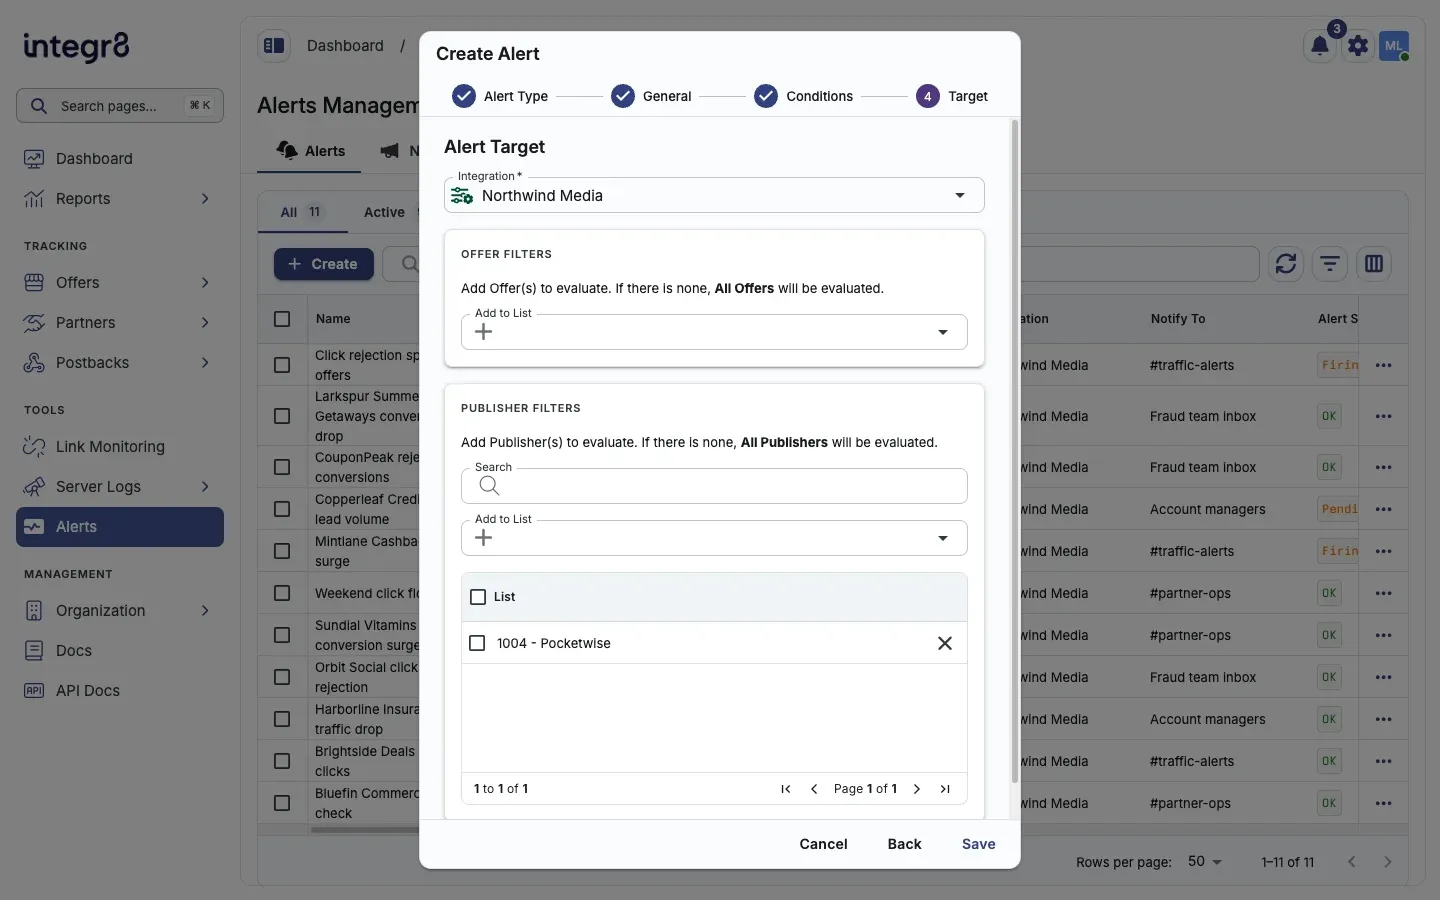
After saving, click To Alert Page to open the new alert, or Cancel to return to the list.
Manage alerts
Section titled “Manage alerts”Use the tabs above the table to filter alerts: All, Active, Paused, Firing, and OK. Each tab shows how many alerts it contains.
Default columns:
| Column | Description |
|---|---|
| Name | Alert name. Click it to open the alert |
| Type | Alert type, such as Click High Rejection Rate |
| Condition | The threshold in plain language, such as Rejection % Rate is Greater Than 30% |
| Time Period | Data window each check looks at |
| Integration | Integration the alert watches |
| Notify To | Notification channel that receives the alert |
| Alert Status | Result of the latest check: Firing, Pending, or OK |
| Status | Whether the alert is active or deactivated |
| Created, Updated, Last Updated By | When the alert was created and last changed, and by whom |
Admins can use the row actions to:
- Activate or Pause an alert. A paused alert stops checking and sending notifications, but keeps its settings.
- Evaluate an alert to run a one-off test. A confirmation appears when the test is sent.
- Edit an alert, which opens its Settings tab.
- Delete an alert.
To change several alerts at once, select their rows and use Activate, Pause, or Delete from the bulk actions.
Alert detail
Section titled “Alert detail”Open an alert to see its configuration and latest result. The General tab shows:
- Alert Details: name, alert type, whether it is active, notification channel, Evaluation Status, and Last Notification Sent
- Alert Conditions: condition, time period, notification options, and the target integration, offers, and publishers
- Evaluation Result: the values measured by the latest check, one row per group the alert evaluated (for example, per publisher)
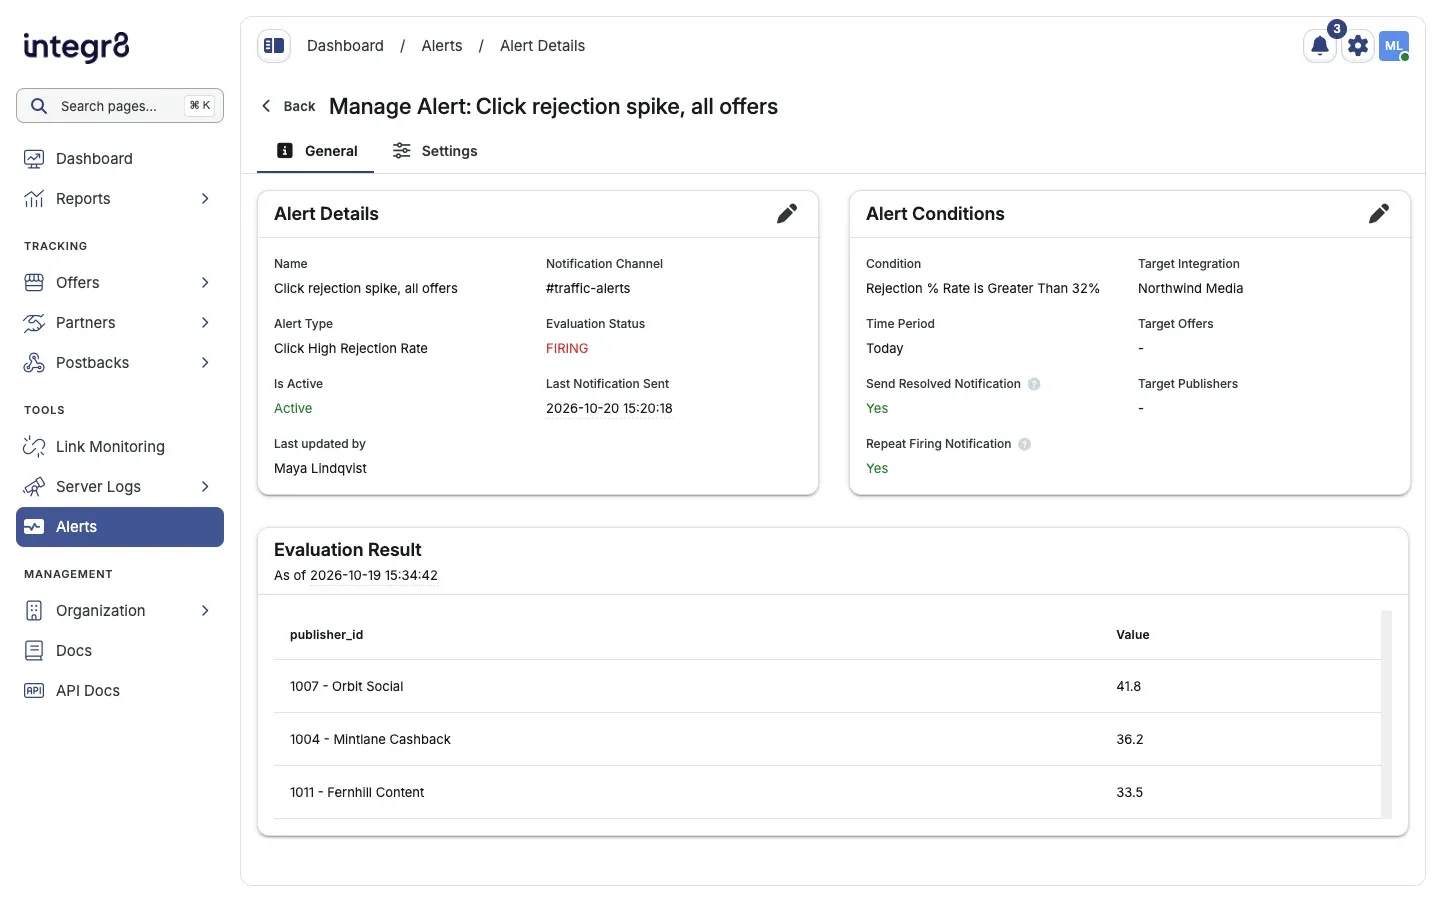
Admins also see a Settings tab. It has the same General, Conditions, and Targets fields as the Create Alert dialog. Change what you need and save. You can also delete the alert from there.
When an alert fires
Section titled “When an alert fires”- Open the alert from the message or from the Firing tab.
- Check Evaluation Result to see which offers or publishers crossed the threshold, and by how much.
- Investigate in reports for the same time period, or in Server Logs for individual rejected requests.
- Fix the cause, for example by pausing a publisher or adjusting an offer.
- Wait for the next check. When the condition is no longer met, the alert returns to OK. If Skip resolved notifications is off, the channel gets a message that the alert has resolved.
If an alert fires too often for something you already know about, pause it or turn off Repeat firing notifications instead of deleting it.
Field reference
Section titled “Field reference”| Field | Required | Description |
|---|---|---|
| Choose Alert Type | Yes | What the alert watches. See Alert types |
| Alert Name | Yes | Name shown in the list and in notifications |
| Notification Channel | Yes | Email or Slack channel that receives the alert |
| Skip resolved notifications | No | On by default. No message when the alert recovers |
| Repeat firing notifications | No | On by default. A message on every check while the alert is firing |
| Activated | No | On by default. Off creates the alert paused |
| Operator | Yes | Comparison used for the threshold. Total Count alerts support Greater Than and Less Than |
| Rejection % Rate | High Rejection Rate only | Rejection rate threshold, in percent |
| Minimum Click Count, Minimum Conversion Count | High Rejection Rate only | Minimum traffic before the rejection rate counts |
| Clicks Total, Conversions Total | Total Count only | Count threshold |
| Increase %, Decrease % | Traffic Increase and Decrease only | Change threshold, in percent |
| Time Period | Yes | Data window each check looks at |
| Check Interval | Yes | How often the alert runs, within the limits for its type |
| Integration | Yes | Integration the alert watches |
| Offer Filters | No | Offers to evaluate. Empty means all offers |
| Publisher Filters | No | Publishers to evaluate. Empty means all publishers |
Next steps
Section titled “Next steps”- Link Monitoring: get downtime alerts for landing pages. Link Monitoring has its own notification settings, separate from Alert Manager channels.
- Server Logs: inspect the individual requests behind a rejection-rate alert.